Part 2: Appium Architecture, Tools Setup & How Test Code Connects to Devices
1. How is the Appium System Structured? (Architecture Overview)
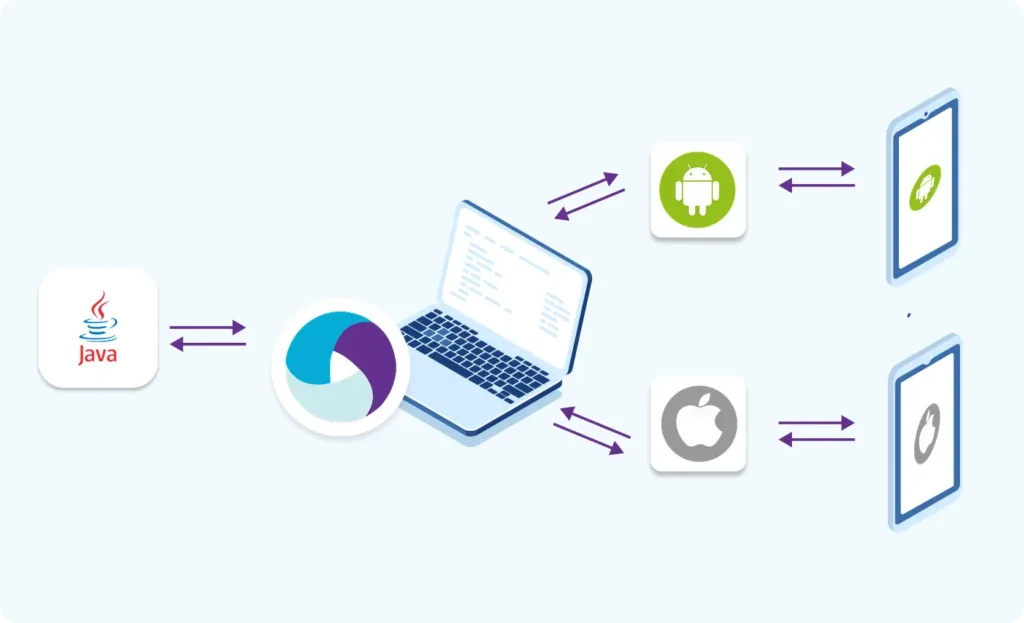
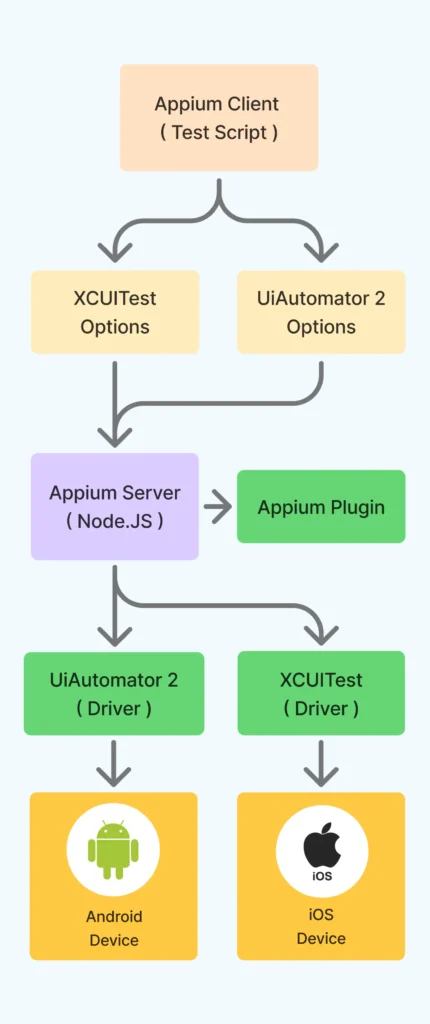
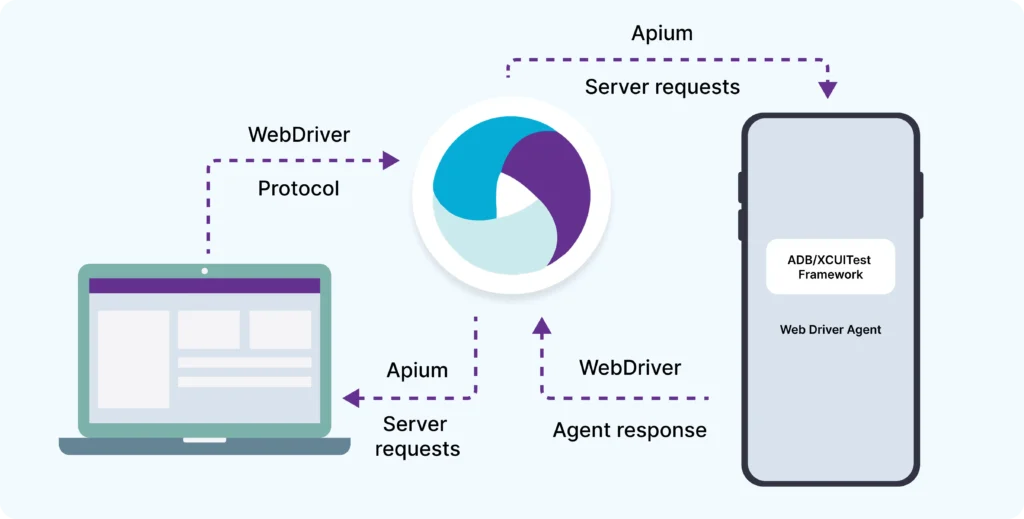
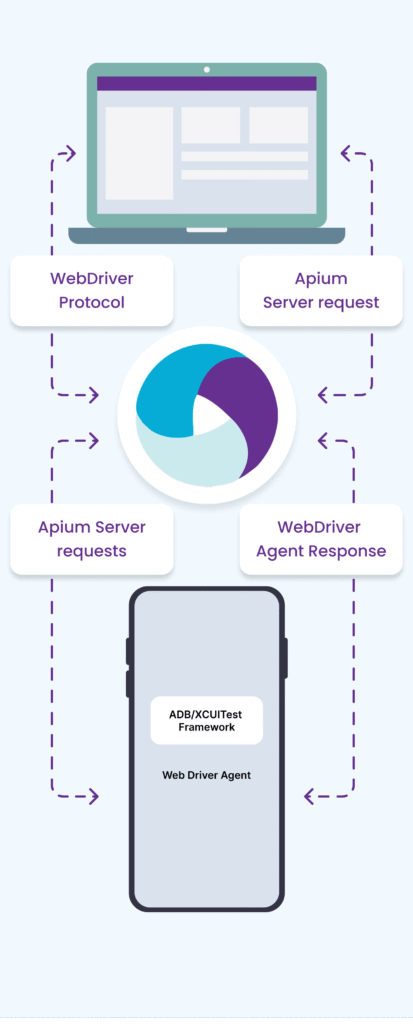
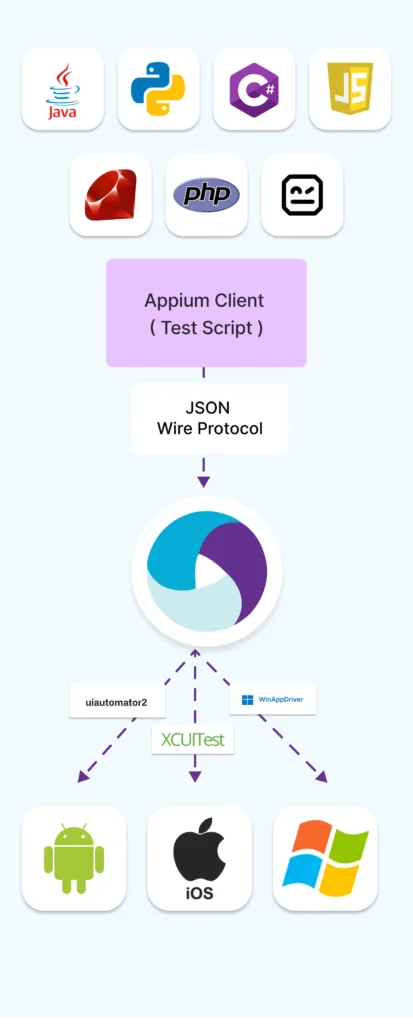
Imagine Appium as a communication bridge that connects your test script (written in Java or any language) with the mobile device (real phone or emulator) where the app runs.
Key Components:
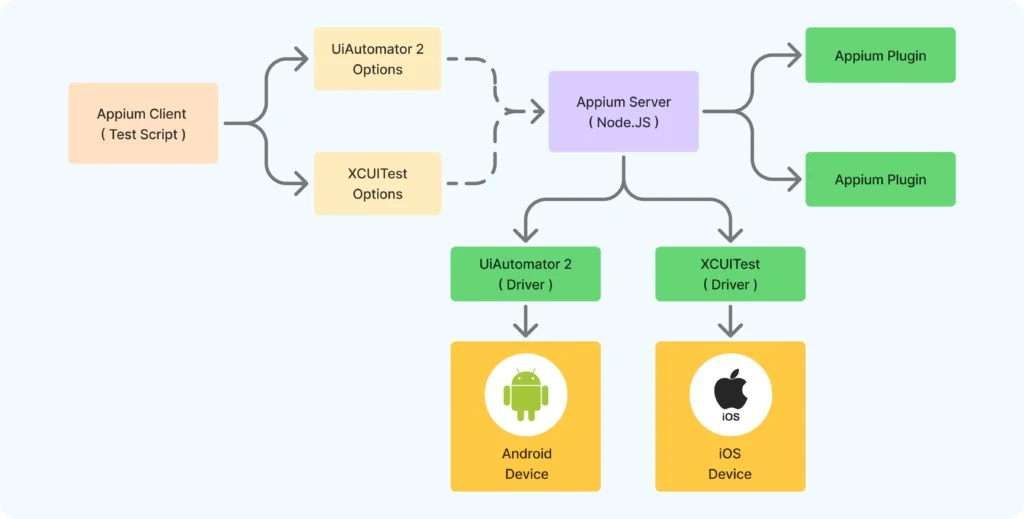
a) Appium Client (Your Test Script)
- You write your test script using Appium’s libraries in languages like Java, Python, or JavaScript.
- Your code contains commands like: click a button, enter text, scroll, etc.
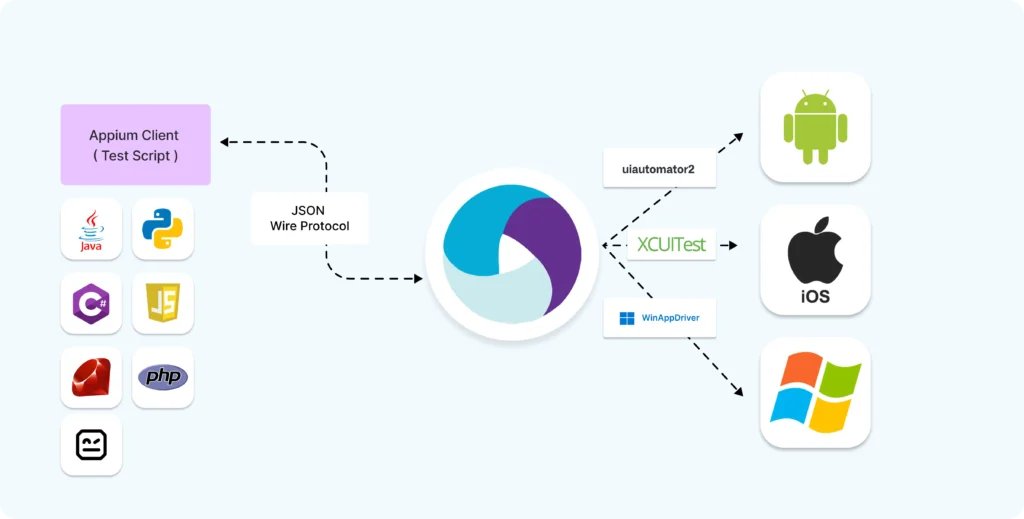
- This client converts your commands into a standardized message format called JSON (like a universal language).
b) Appium Server
- This is a Node.js server running on your machine or on a remote machine.
- The server listens to your Appium Client’s JSON commands over a network (usually localhost).
- It acts as the interpreter and controller, deciding what to do with each command.
- It communicates with the right platform driver (Android or iOS).
c) Platform-specific Drivers
- These are special tools that “speak” directly to the mobile device’s automation frameworks.
- UiAutomator2: The driver for Android devices.
- XCUITest: The driver for iOS devices.
- These drivers take commands from the server and translate them into device-specific instructions.


d) Mobile Device or Emulator/Simulator
- The real physical phone or virtual device where your app is installed.
- The device receives instructions from the driver and executes them.
- Responses from the device go back through the same chain to your test script.
Visualizing the Structure:
					Your Test Code (Appium Client)
          ↓ (JSON commands)
     Appium Server (Node.js)
          ↓ (Platform specific commands)
 Platform Driver (UiAutomator2/XCUITest)
          ↓ (Native device commands)
   Mobile Device / Emulator
          ↑
    Sends responses back to Test Code through the same path
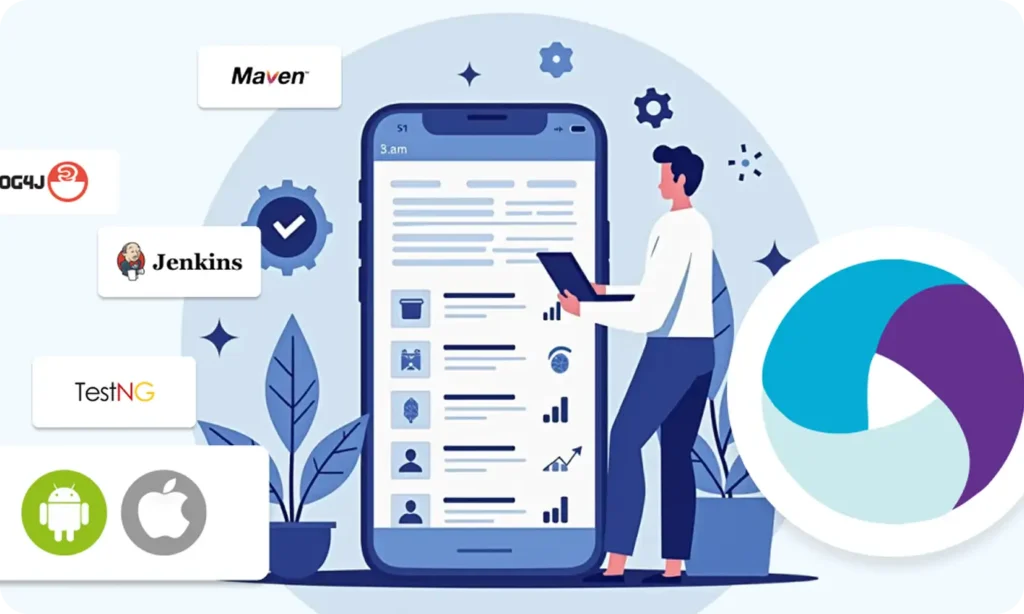
2. What Tools Do You Need to Install Before You Start?
To set up Appium on your computer (Windows or Mac), here’s a list of essential tools:
Tool
Purpose
Download Link / Notes
Java Development Kit (JDK)
Needed to write and run Java-based tests
Same as host system
Android Studio
To create and manage Android emulators & SDK tools
Appium Server
The core Appium server that listens to test commands
Installed via Node.js using npm (explained below)
Eclipse / IntelliJ IDEA
IDEs to write your Java test scripts
Appium Desktop GUI (Optional)
A graphical interface to start/stop Appium server
Extra for iOS (Mac only):
Tool
Purpose
Xcode
Needed to run and manage iOS simulators
Carthage
Dependency manager needed for WebDriverAgent
3. How Does Your Test Code Connect to the Mobile Device or Emulator?
Let’s walk through the connection process:
Step 1: Start Appium Server
- You launch the Appium Server on your computer.
- The server usually listens on port 4723 (default).
- It waits for commands from your test script.
Step 2: Write Your Test Script (Appium Client)
- In your Java code, you specify Desired Capabilities — a set of key-value pairs.
- Desired Capabilities tell Appium:
- Which platform you want to test (Android/iOS)
- Which device or emulator to use
- Which app or package to test
- Other settings like automation engine, platform version, device name, etc.
- Which platform you want to test (Android/iOS)
Example (Java):
					DesiredCapabilities caps = new DesiredCapabilities();
caps.setCapability("platformName", "Android");
caps.setCapability("deviceName", "Pixel_3_API_30");
caps.setCapability("appPackage", "com.example.myapp");
caps.setCapability("appActivity", "com.example.myapp.MainActivity");
Step 3: Your Test Script Sends Commands to Appium Server
- Based on the capabilities, Appium Server decides which driver to use (UiAutomator2 for Android, XCUITest for iOS).
- It launches the session on the specified device/emulator.
Step 4: Appium Server Analyzes and Routes Commands
- Based on the capabilities, Appium Server decides which driver to use (UiAutomator2 for Android, XCUITest for iOS).
- It launches the session on the specified device/emulator.
Step 5: The Platform Driver Sends Commands to Device
- The driver uses native automation frameworks on the device to perform actions.
- For example, UiAutomator2 clicks the button you specified.
Step 6: Device Executes the Command and Responds
- The device performs the action.
- The response (success/failure) travels back through driver → server → client.
Step 7: Your Test Script Receives the Response
- Your Java test code can verify if the action succeeded and proceed accordingly.
Why Is This Important?
This client-server architecture makes Appium powerful because:
- Your test code doesn’t need to worry about the complex device-specific commands.
- Appium handles communication and command translation.
- You can write tests once and run them on multiple devices/platforms.
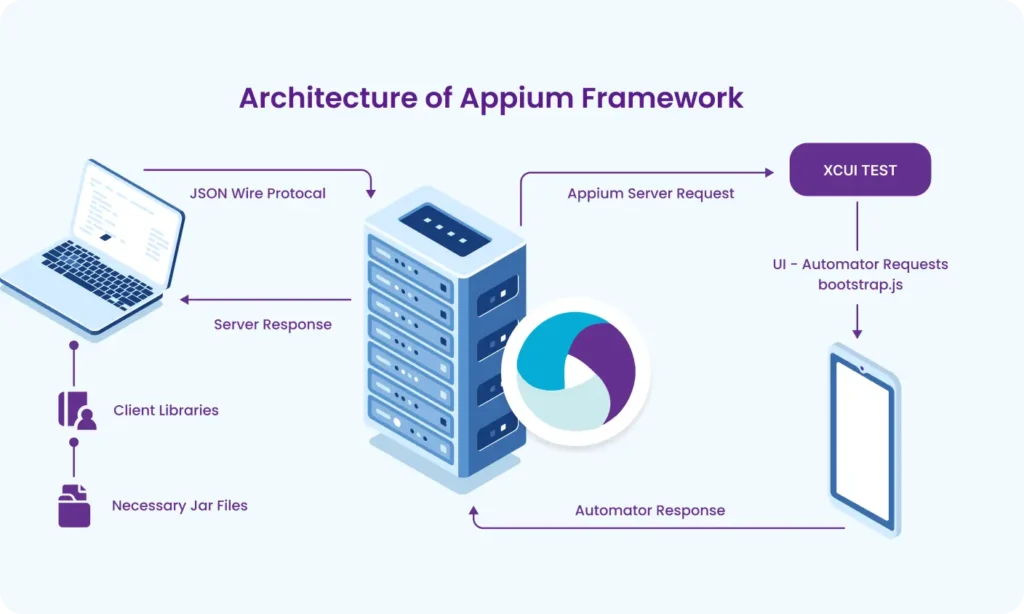
Appium's Functionality on Android and iOS
Appium works on both Android and iOS by translating your test commands into actions that real or virtual devices can understand — all using standard protocols like Mobile JSON Wire Protocol or W3C WebDriver Protocol.
Here’s how it works under the hood for both platforms:
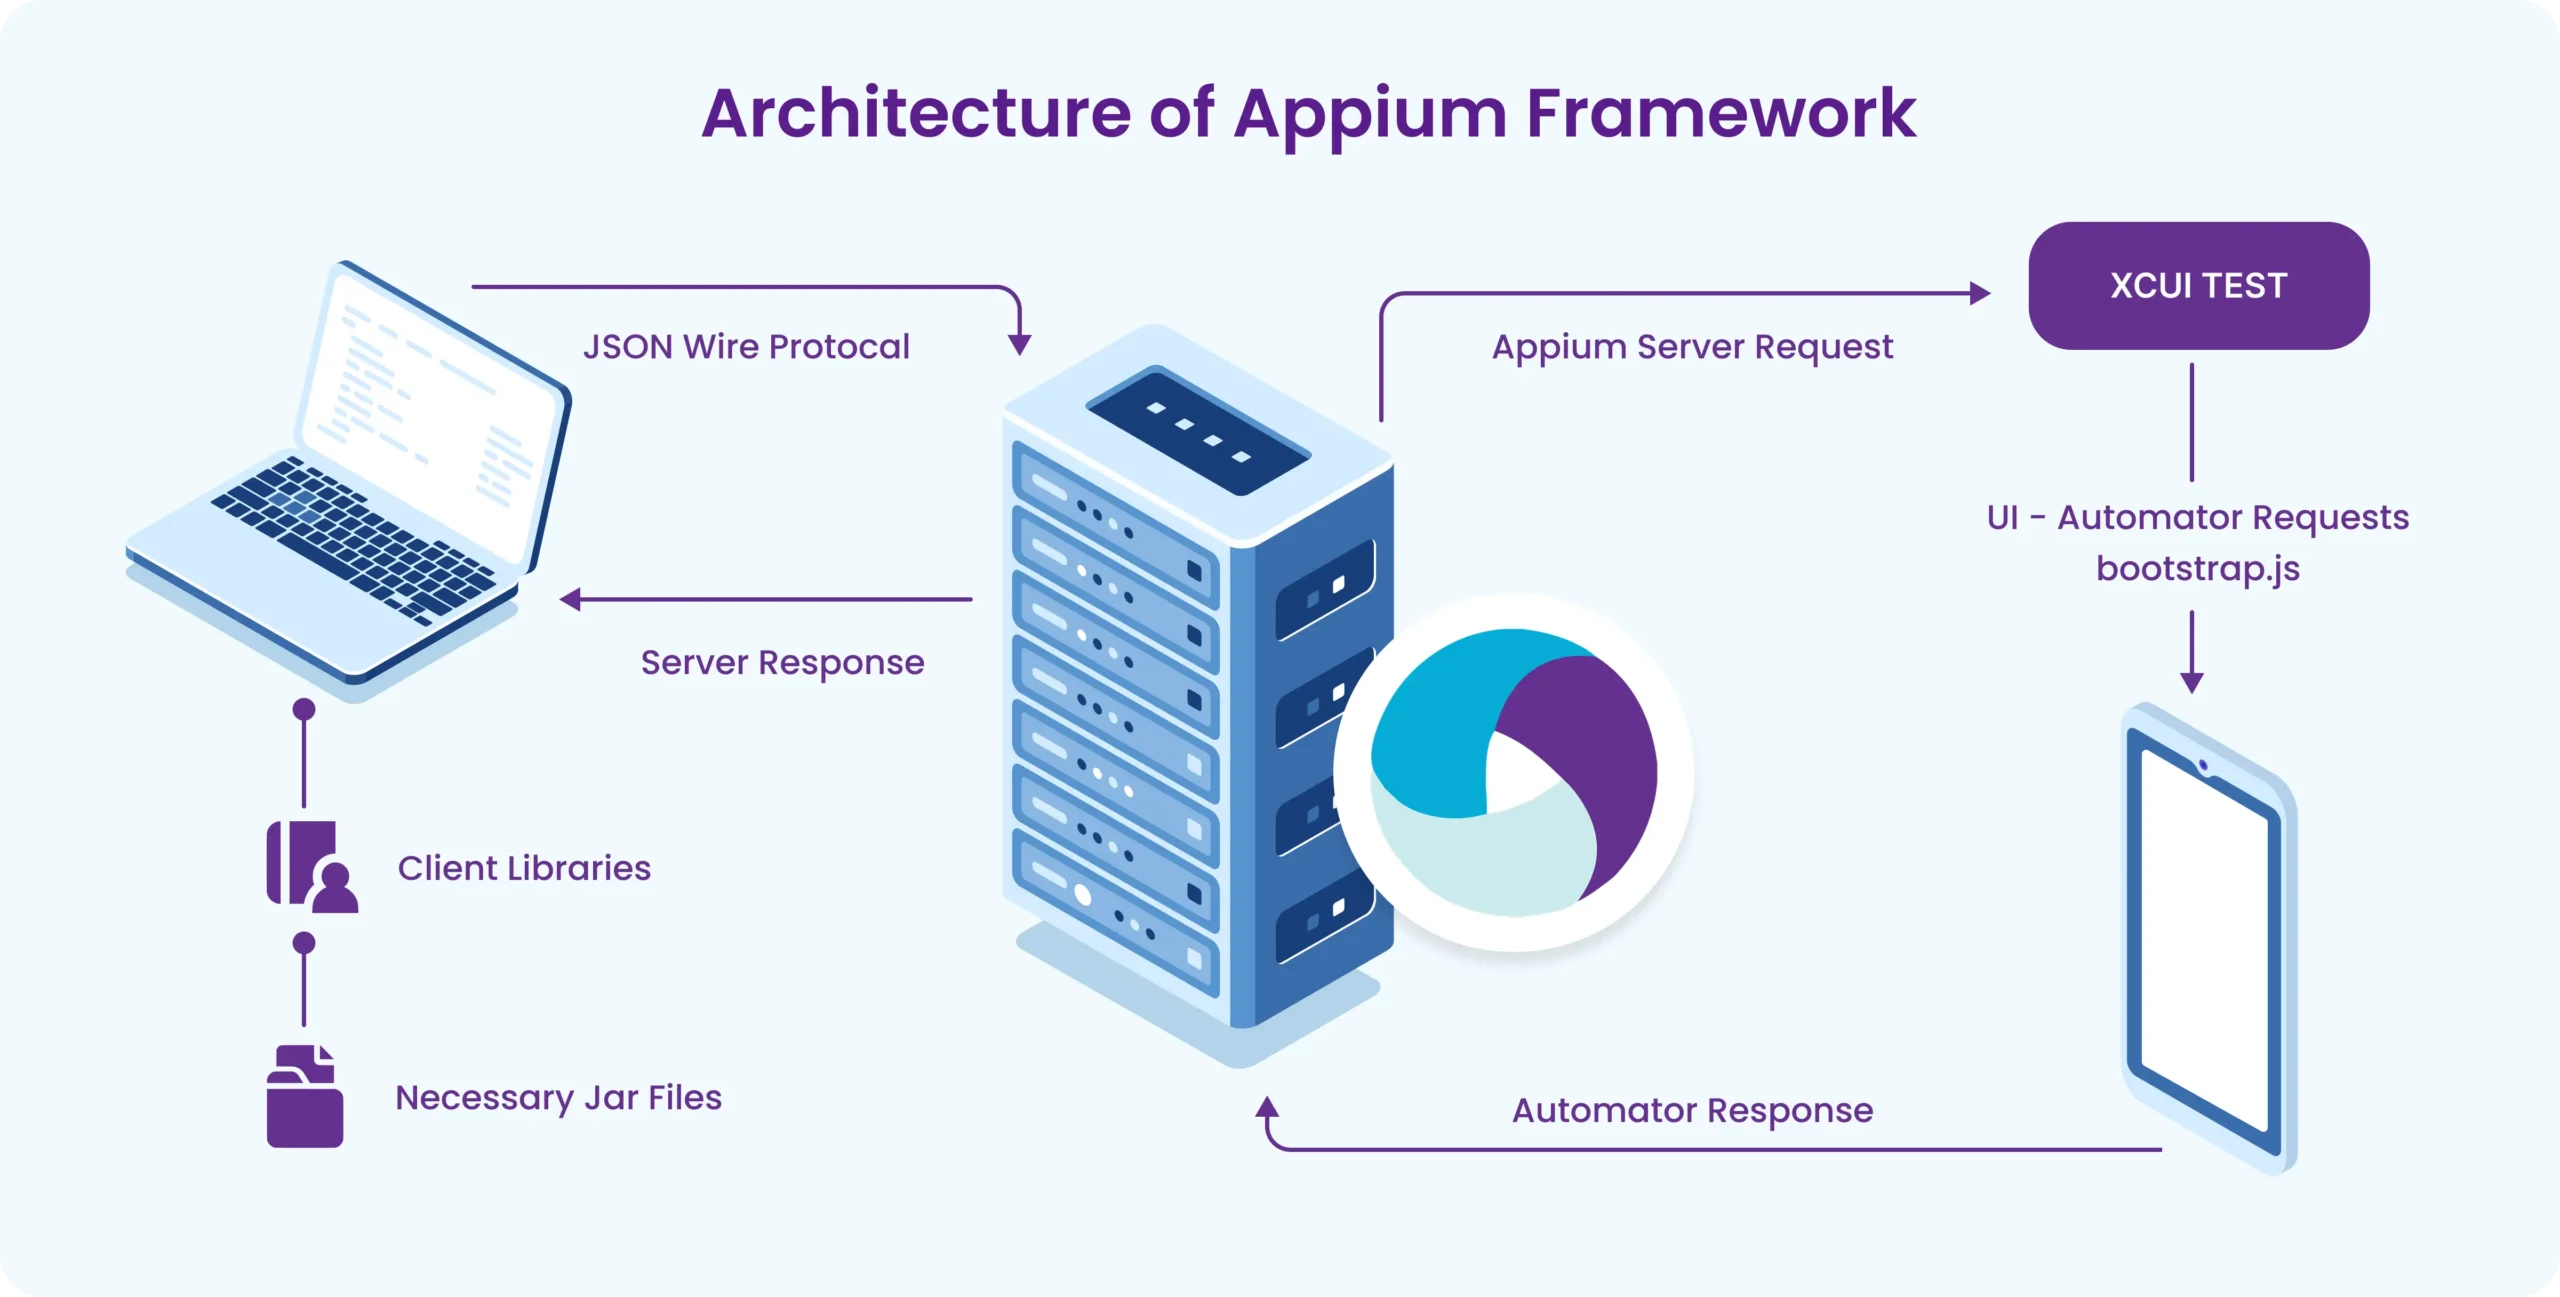
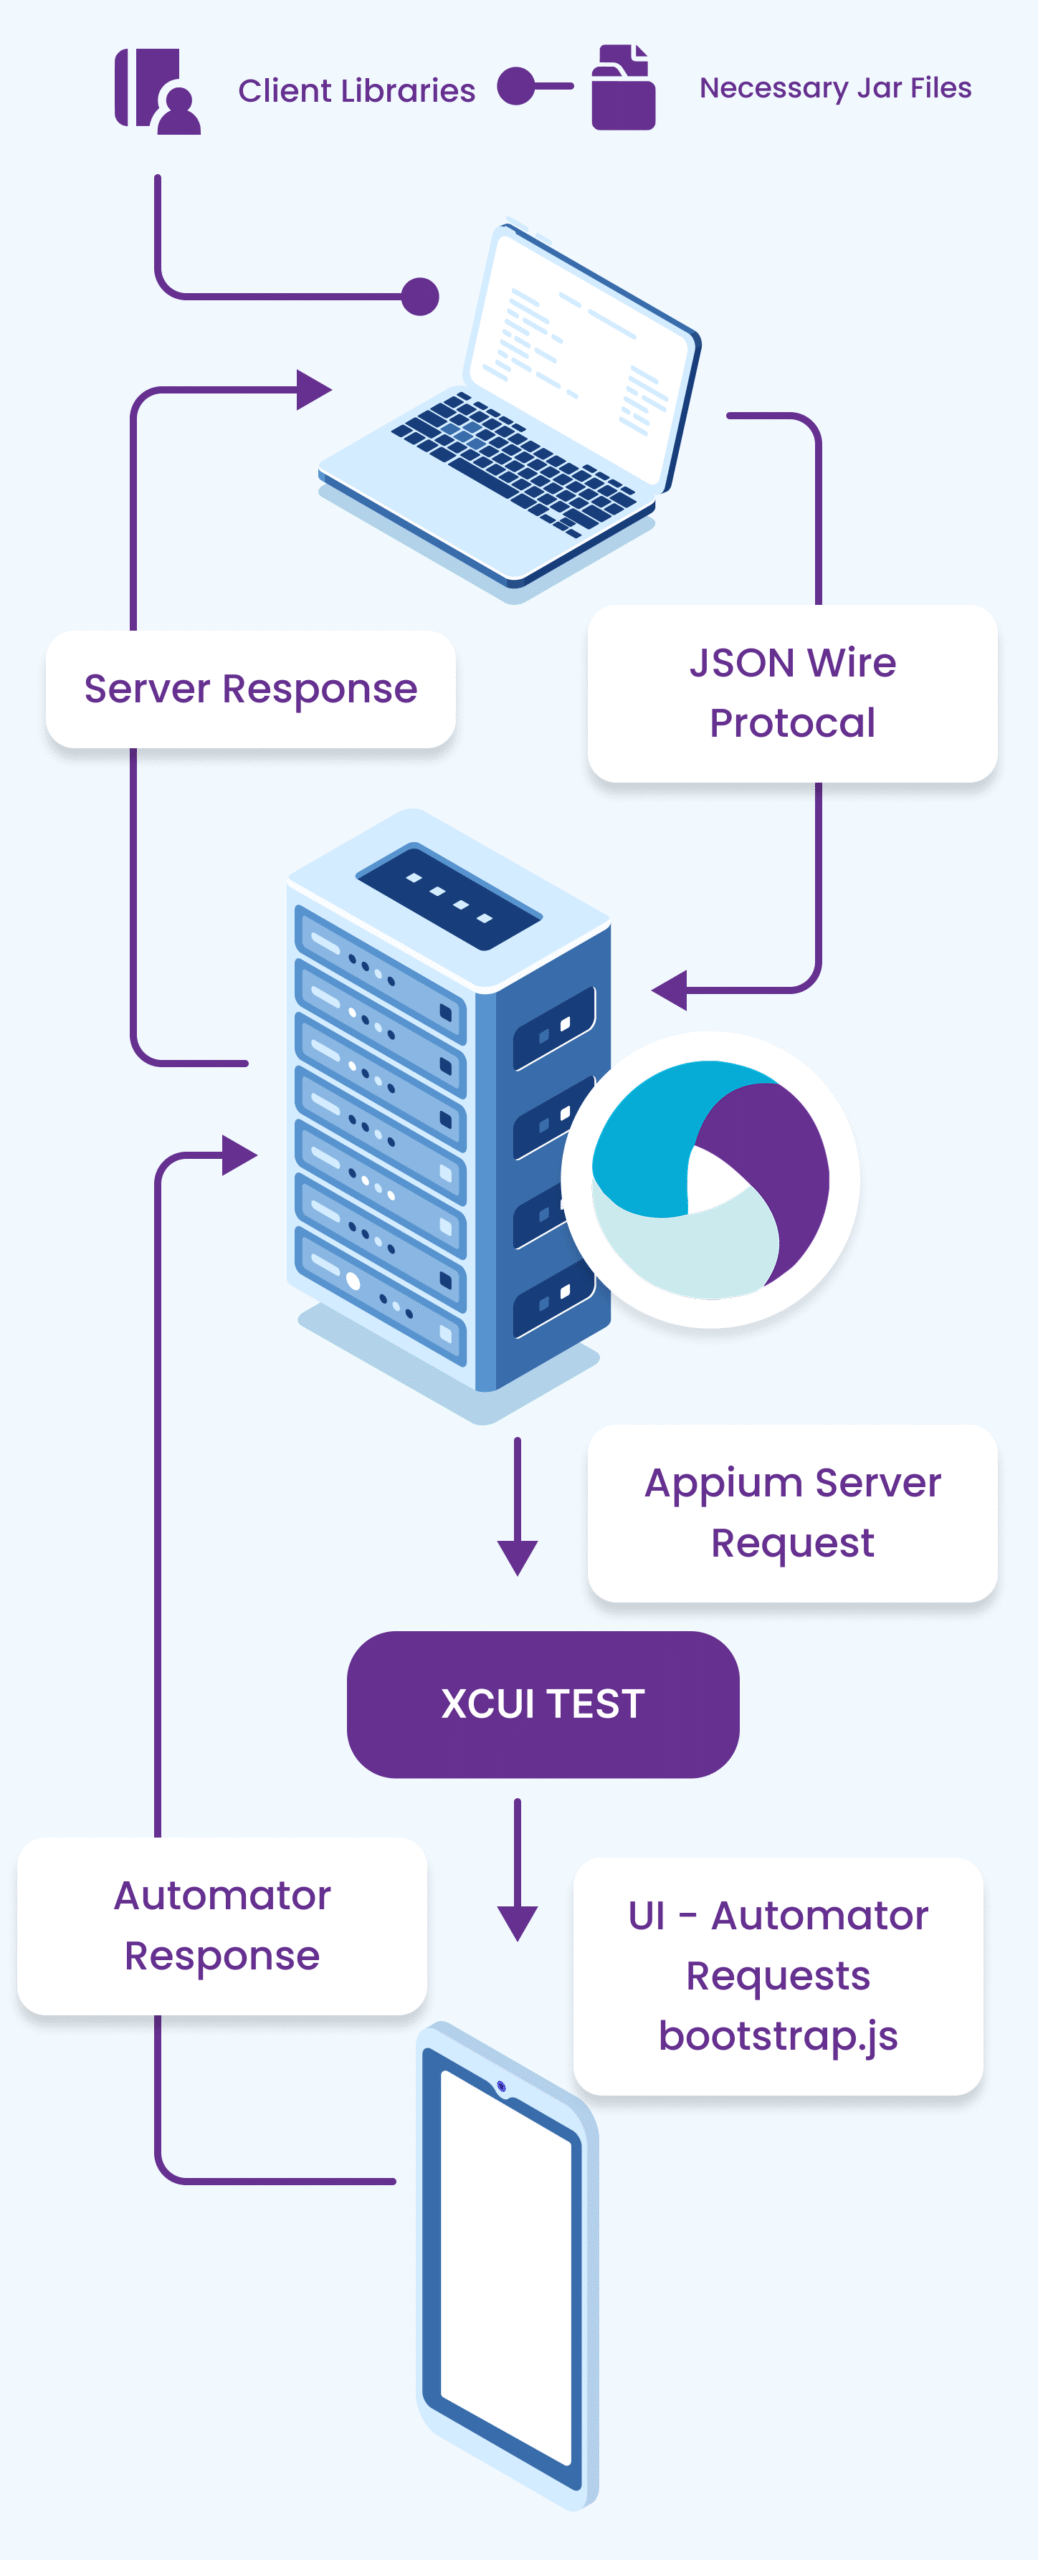
On Android
When you run Appium tests on Android:
- Your test script (written in Java.) sends commands via the Appium client library.
- These commands are turned into REST API calls and sent to the Appium server.
- The server then uses automation frameworks like UIAutomator2 (or older ones like Selendroid) to interact with the device.
A file called bootstrap.jar is used to bridge the commands and the device, allowing the device to understand what actions to perform (like clicking a button, typing text, etc.).
Once the action is complete, the response travels back through the same chain — from device ➝ server ➝ client — including any results or errors.
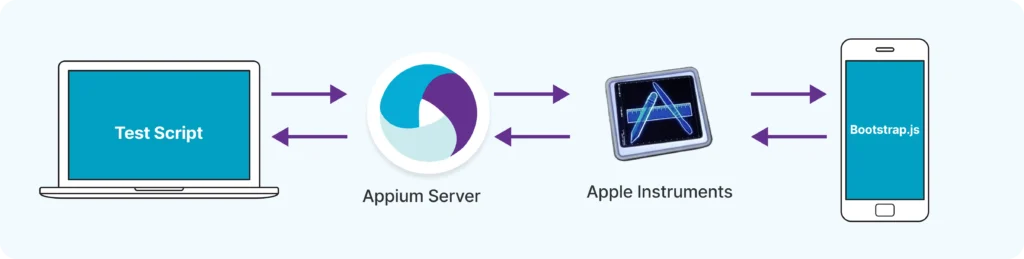
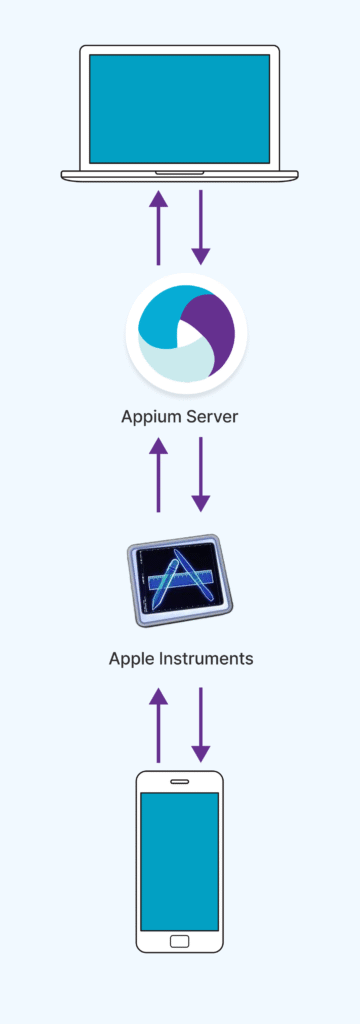
On iOS
For iOS devices, Appium follows a similar process but uses Apple’s native automation tools:
- Commands are sent from the Appium client to the server.
- The server communicates with a helper app called WebDriverAgent.app, which is installed on the iOS device.
- This helper app uses XCUITest (Apple’s testing framework) to run the commands on the app.
WebDriverAgent translates your test commands into native iOS interactions, and results are returned in the same way — all while following the JSON Wire/W3C protocol.
Summary of Part 2:
Topic
Key Points
Appium System Structure
Client code → Appium Server → Platform Driver → Device → Response
Tools to Install
Java JDK, Node.js, Android Studio, Appium Server, IDE, (Xcode & Carthage for iOS)
How Code Connects to Device
Using Desired Capabilities, JSON commands sent to Appium Server listening on port 4723
Building complex IoT systems?
Accelerate testing and deployment with our QEMU-integrated toolchain expertise.
Mastering Appium: A Complete Beginner-to-Expert Mobile Automation Guide
Part 1: Introduction to Mobile Automation and Appium
Part 2: Appium Architecture, Tools Setup & How Test Code Connects to Devices